Your First Application
Create main.cpp:
#include <SableUI/SableUI.h>

class Counter : public SableUI::BaseComponent {
public:
    void Layout() override {
        Div(bg(245, 245, 245) p(30) centerXY w_fit h_fit rounded(10)) {
            Text(SableString::Format("Count: %d", count),
                fontSize(28) mb(20) textColour(20, 20, 20) justify_center);

            Div(left_right p(4) centerX rounded(9)) {
                Div(bg(90, 160, 255) p(8) mr(5) rounded(5)
                    onClick([this]() { setCount(count + 1); })) {
                    Text("Increment",
                        textColour(255, 255, 255) fontSize(16) justify_center);
                }

                Div(bg(255, 120, 120) p(8) rounded(5)
                    onClick([this]() { setCount(count - 1); })) {
                    Text("Decrement",
                        textColour(255, 255, 255) fontSize(16) justify_center);
                }
            }
        }
    }

private:
    useState(count, setCount, int, 0);
};

int main(int argc, char** argv) {
    // Register your component
    SableUI::RegisterComponent<Counter>("Counter");

    // Initialize window
    SableUI::Window* window = SableUI::Initialise("Counter App", 800, 600);

    // Create layout
    Panel("Counter");

    // Main loop
    while (SableUI::PollEvents())
        SableUI::Render();

    SableUI::Shutdown();
    return 0;
}
First build
Windows:
mkdir build
cd build
cmake ..
Open MyApp.sln in Visual Studio, set MyApp or your project as startup, and build.
OR open CMakeLists.txt in Visual Studio and everything should configure by itself.
Linux/macOS:
mkdir build && cd build
cmake ..
make -j$(nproc)
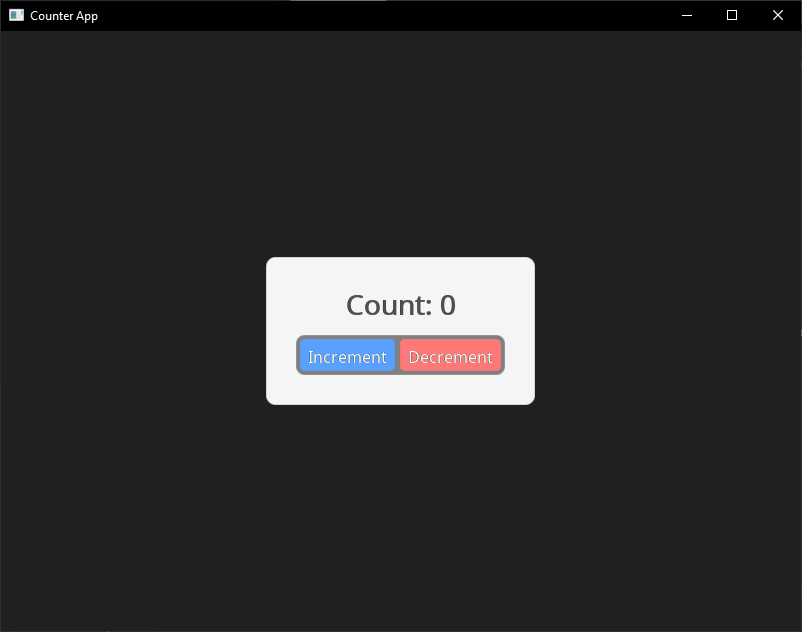
Building and running your application you should now see the following on your screen:
 Having Issues? Check troubleshooting
Understanding the Code
1. Component Definition
class Counter : public SableUI::BaseComponent {
    void Layout() override { /* ... */ }
};
Components inherit from BaseComponent and override Layout() to describe their UI.
2. State Management
useState(count, setCount, int, 0);
This declares a reactive state, calling setCount() modifies count and triggers a re-render.
NOTE: This is simmilar to react's
useState, synonymous with:const [count, setCount] = useState<int>(0)
3. Declarative UI
Div(bg(245, 245, 245) p(30)) {
    Text("Hello");
}
The use of macros (div(...)) and RAII ensure elements are properly opened and closed.
4. Event Handling
onClick([this]() { setCount(count + 1); })
Lambda callbacks capture state and trigger updates.
5. Registration & Initialisation
SableUI::RegisterComponent<Counter>("Counter");
SableUI::Window* window = SableUI::Initialise("App", 800, 600);
Register component types by name, then initiliase your first window.
6. Panel Layout
Panel("Counter");
Attach registed components to panels, the scope for panel layout is created after window initialisation.
Next Steps
By here, you now have a working SableUI application, you can either get a better understanding on the specifics of certain areas above, or go to the following pages.


